

In this blog I have outlined a layered quad method that is designed to take the confusion out of complex quad mechanics while letting you concentrate on what matters for your shot, the performance. This layered approach is easily the fastest way I have found to animate quads and uses reference as a tool for creating motion without directly copying it. If you would like to see a more reference focused approach, see Reference Based Method.
- Step 01 – Basic Staging & Finding Reference
- Step 02 – Character and Reference Analysis
- Step 03 – Front Legs and More Reference
- Step 04 – Rough Blocking of Hind Legs & Hips
- Step 05 – Addressing Notes & Tighter Matching of Reference
This tutorial is structured to mimic a potential shot you may get in a film, complete with how to address notes. The early steps focus on performance while the later on mechanics. During all Steps you should be able to show your animation to your Supe/lead for direction.
All up, the below shot took two days to animate with Step 1 -4 taking a day and Step 5 another whole day. This shot was designed to show a way to piece together a quadruped animation and is not a polished piece.


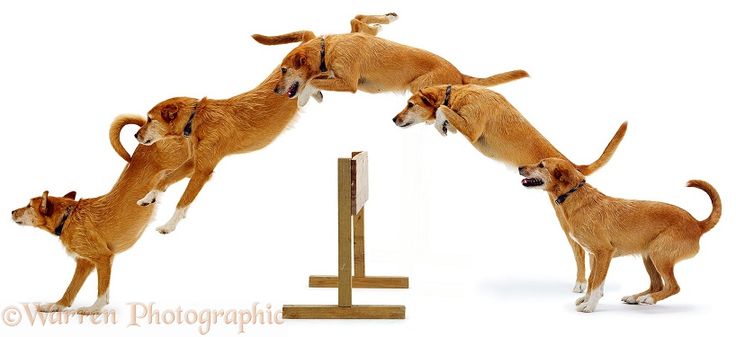
Shot Brief – Happy dog and bird
Happy Dog chases a bird onto a rock. Losing the bird for a second until it suddenly flies passed her nose, Happy Dog jumps from the rock and continues the chase.
Step 01 – Basic Staging & Absorbing Reference – Skip to Step 02, Step 03, Step 04, Step 05.
1.0 – Absorbing reference
Before you start setting keys, search for reference for inspiration. Generally analyse so you have overview of the mechanics needed for your shot. Below is a compilation that really sums up what I’m looking to do with ‘Happy Dog’.
1.1 Setup your Rig
Set your pivots and rotation orders appropriate to your shot. (Setup and Rotate Orders)
1.2 – Staging your Shot & Exploring Ideas
To start my block I have hidden the legs and tail and have only animated 2 controls to explore the motion I am creating. I have payed particular attention to animate in 3D not just to the camera. Essentially this is the first step in straight ahead layered animation. Some people call it ‘chess-piecing’. Think of it as the first step to define basic trajectories, orientation and most importantly, the staging of your shot.
- hide the legs – explained later
- setup your rig to focus only on the head COG (Setup)
- animate only the COG and head
- work primarly on staging
- keep your animation curves simple
- check top view
- keep your animation curves simple so you adjust quickly and explore ideas
For more info on why you would hide the legs, check out the page Hide the Legs!? Focus on the Spine.
1.3 – Adding Physics to your block
For animation with jumps or falls, reference your animation curves against a gravity curve. see (Gravity and Gravity Curves) for more info.

This ‘Translate Y curve’ is the moment my dog jumps from the rock which I have reference against black gravity curve.
Step 02 – Character and Reference Analysis – Skip to Step 01, Step 03, Step 04, Step 05.
2.0 – Starting your Block
Now the basic staging/layout is done with just the COG and Head, it’s time to start working on the character and basic mechanics of the shot. Again, this step is all about working on your ideas using the least amount of controls to do so.
In the first step you want to animate with the whole torso pivoting from the center. This helps you understand the full form of the quad you are working on. However, in the second step, you move your focus to just the chest (hiding the hips) and head.
Keep the legs hidden! Yup, it may sound odd, but it’s essential to keep you focused on what matters in the initial stages of your animation. In this step add basic rise and falls of the chest based on reference. This is the first step in mapping the footfalls for later.
- keep legs hidden
- setup your rig to focus just on the chest and head (Setup)
- find reference relevant to your shot and analyse. In this case – gait intervals and the relationship between the head and chest during a jump and landing.
- from analysis of gait intervals apply basic rise and falls of the chest to your ‘translate y’ animation curves
- from reference understand and apply the relationship between the head and chest related to your animation
- flesh out the character, have the funs!
- don’t worry about the legs!
2.1 – Setting up your Rig to focus just on the chest
In the follow step I bake my first step staging animation onto a chest controller using maya constraints. This is so I can animate my chest in world space.
From Step 01, bake your COG animation onto just the chest so you have a clean world space pivot.
- bake your COG animation to a Chest Loctator
- create a Hip Locator that is parented (with maintained offset) to the chest and hide it. This will be used later.
For further information on this way of animating see
2.2 – Keep the legs hidden!? Why Animate like this!? What about my Full Body Controller?
Why do this!? So your curves make sense! It may sound odd, but it’s essential to keep you focused on what matters in the initial stages of your animation. In this step add basic rise and falls of the chest based on reference. This is the first step in mapping the footfalls for later.
For further information on this way of animating see
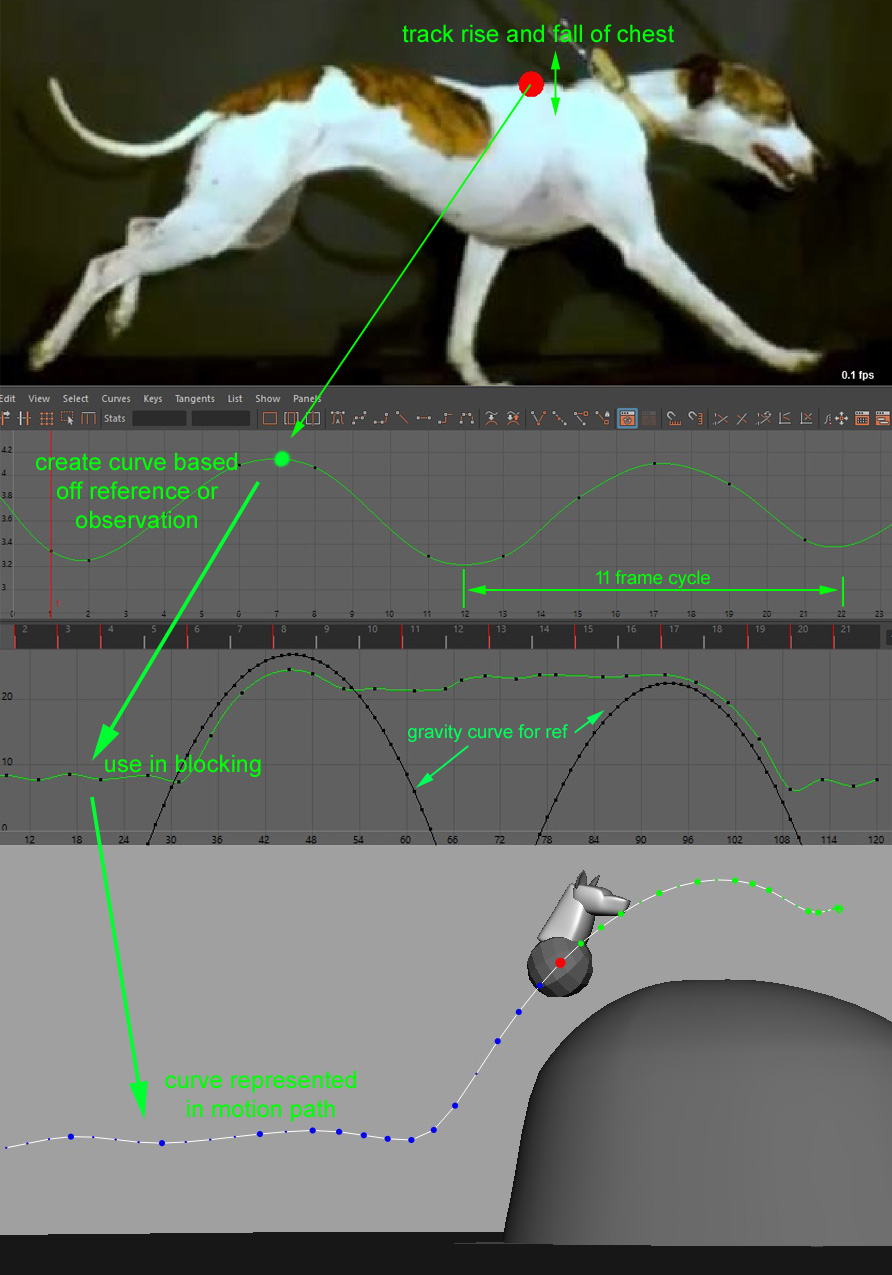
2.2 – Reference – The rise and fall of the chest
Analyse reference and try to break up your animation into ‘Mechanical Components’. This is because it can be hard, particularly in quads to decipher them as a whole. For my shot, these components are the gallop, the jump and landing.
One thing that is hard to find in reference is footage shot from above. It’s a real shame because for me it really unlocks the quad. Make sure you check this view repeatedly and check out my notes – (From Above)
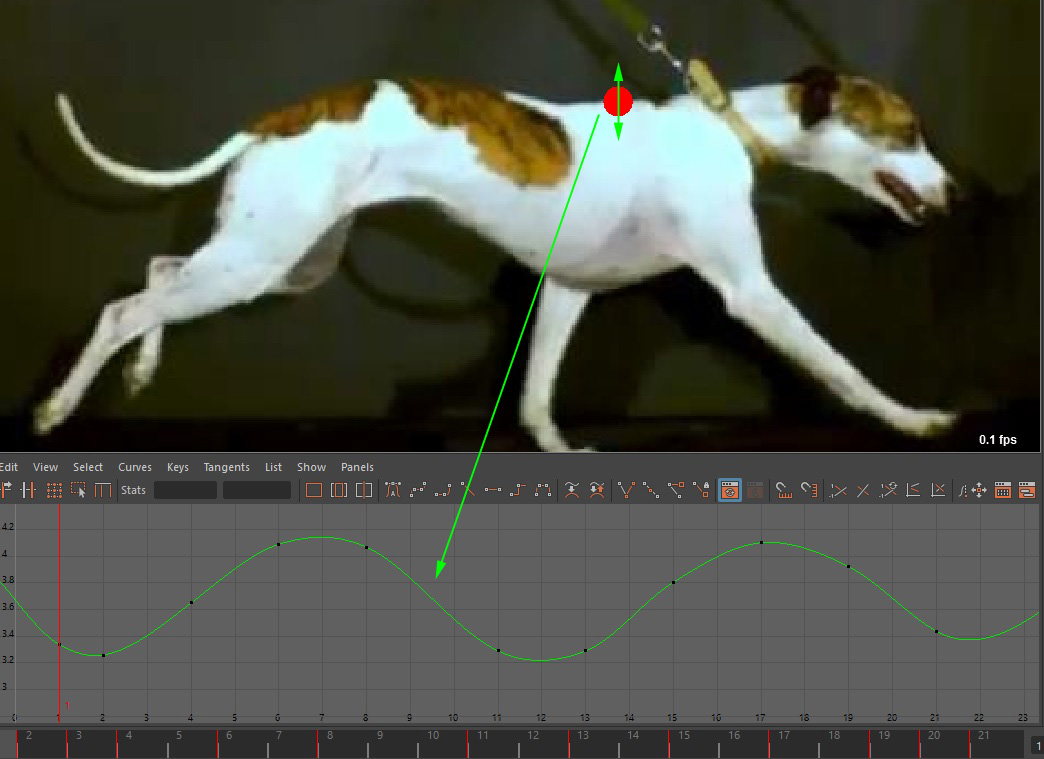
Here I have tracked the rise and fall of the chest on just the y translate curve.
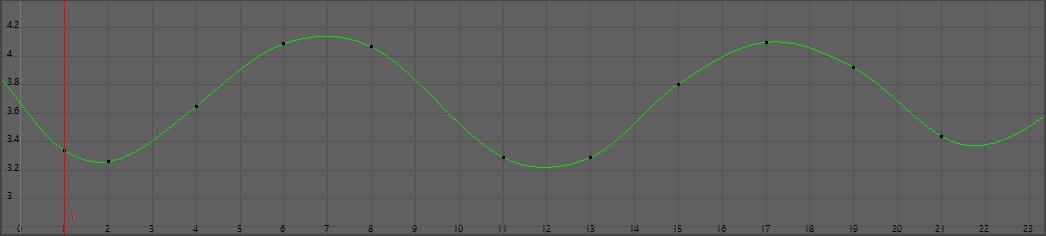
Looking at the curve above you can see the gallop cycles every 10 frames – based on 24 frames per second footage. I’ll take this curve and apply it to my chest blocking where appropriate and scale it if I think it is too fast or slow. You can also see where I’ve used the gravity curve for reference. See below.
2.3 – aTools – Toolset for Animators
The above image shows the arc or trajectory of my quads chest and was created with atools. DOWNLOAD IT!! It’s awesome. Download aTools Here
Also have a look at my Anim Tech section for info on helpful scripts and tips for animation.
2.4 – Reference – The Jump and Landing
Below is some reference I have found to try understand the relationship between the head and chest during a jump and landing. I have applied this to my animation and will look at the legs later.
- head leads the jump
- head and chest position level out at the apex of the jump
- when chest fall, head pulls back and hips scrunch
Step 03 – Front Legs and More Reference– Skip to Step 01, Step 02, Step 04, Step 05
3.0 – Blocking in the Front Legs
Finally it is time to start blocking in the legs.. but just the front legs! Using the gait analysis from the previous step you can start to map in the foot falls and take offs. Check in on some reference relevant to your shot and consider the mechanics you will need to make your action believable.
- unhide front legs & keep rear legs hidden
- find reference relevant to your shot and analyse
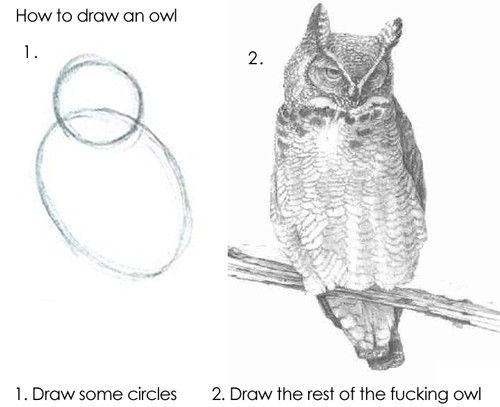
3.1 – Get on and animate the thing!?
Step 03 may feel a little like how the drawing below suggests.. and it’s not far off. Approach this step as you would in biped animation and don’t concern yourself with the hind legs just yet.
You may find you have moved your chest to high or too low when they were hidden making the legs stretch when you pose them. So now with the legs turned on before you worry about foot falls, roughly test pose them and scale your y curve to give the appropriate amount of space for your legs.
The Translate Y curve for the chest will strongly dictate where the foot falls should occur. The chest will only start to ease towards its lowest position once the leg takes weight. This is where the heart of your gait cycle is. Spend more time considering this curve and how it affects your performance than worrying too much about foot placements. If you get this curve feeling right your foot falls and take offs will fall in place. See image below.
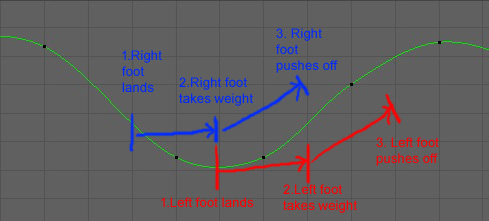
Rise and Fall of the chest on the Y curve and predicting foot falls and take offs.
Step 04 – Rough Blocking of Hind Legs & Hips – Skip to Step 01, Step 02, Step 03, Step 05
4.0 – Rough Animating.. with Structure!
This step feels like a cheat.. and it basically is. Using what we know of the spine and gaits we can quickly and roughly structure our quads B-hind. It involves copying your chest and front leg animation curves onto your hips and hind legs.
- In the above animation, the hips look a little loose and the legs are hyper extended in places, but as a whole, this animation is perfectly suitable to show your supervisor for notes.
The following method is an extremely fast way see your quad animation as a whole – where animating the front legs took about 2 hours, adding the back legs and hips to this point only took 30 minutes. With all the limbs blocked in, you can check in with your supervisor for notes and guidance.
Also, using what I’ve learned by identifying repeating curve patterns (see Patterns in the Curves & Spine Gaits Library) and the general quad mechanics observation – that the hind leg replaces the forelimb after take off (see below). I can predict where the hind legs need to be placed and how far they will travel.
4.1 – Rough Mapping and Timing Offset of the Hips
Bake out your hips on 4’s so the are no longer constrained to the chest. From the chest, Copy the Y curve (up and down) and paste if on your hip controller. The rise and falls of your hips and chest will should now match.
Offset the timing of your hips to match the gait you are animating. You can find reference for this in the Spine Gaits Library or read more about this in Patterns in the Curves and Hide the Legs!? Focus on the Spine.
These are the offset timing for my Happy Dog animation,
- Gallop in – hips offset by +5 frames
- Jump on/off hill – hips offset by +3 frames
- On top of hill – hips offset by +2 frames
(Watch the above video to see how I went about mapping the hips for my shot)
4.2 – Rough Mapping of the Hind Legs
This next step is very similar to the last but requires a bit of tinkering as the feet need to be positioned more carefully.
Copy your translate X and Z curve from the Left Front leg and paste it on the Left Hind Leg. Repeat for the right side.
Apply time offsets. Offset your hind legs to land just after the take off of the corresponding front leg. This offset will vary depending on the gait. But a good guess is half the gait cycle. For example, on a 10 frame cycle, offset the hind legs by 5 frames. See the Spine Gaits Library for reference based examples.
You will need to do a separate simple pass on the translate Y and rotation of your feet (Explained in the video below). Don’t spend too long on this! Almost time to show for notes and it may all be for naught if you have to gait or timings of your shot.
4.3 – Back Legs and Hips Roughly Mapped in… Where to now?
Things to consider before you show your Supervisor for notes
- take a step back and look at your animation in all its four legged glory
- ask yourself, what do you feel is working and what isn’t?
- ask your friends/coworkers what they think
- your supe may want to know where you are headed from here, so prepare your answers and questions
- look for some different reference of the same action to clear your eyes
Time for notes!
Step 05 – Anim Supe Notes & Tighter Matching of Reference – Skip to Step 01, Step 02, Step 03, Step 05
Step 04 – Blocking before notes Step 05 – Blocking after notes
5.0 – Receiving Notes
Animation Supervisor Notes
- the jump is floaty, add another step or scramble of the feet up the rock
- back legs look a little cowboy in places
- gallop in seems slow, speed up a little
- if you can, try to get a little skid/skitter before he leaps up the rock
- add hesitation before dog jumps from the rock
- closer match the jump against the reference
- same for the gallop, match poses of the reference for the hind legs and hips
- in general clean up poses and make sure the mechanics are correct
5.1 – Categorize your Notes and Plan
With the hips and hind legs roughly mapped into your shot it’s time to get some solid notes from your Supervisor… if you are lucky enough they may even send it to the client. But… most likely they will give you a page of notes.. which is what I got. (See below).
This last step can take as long as the first four combined.
First up, consider the notes you have been given and categorize them in order of impact to your keys. Some notes you will be able to quickly achieve while others will require a little finesse. This step can take as long as the first four steps combined. Always focus on the Animation Supervisor’s notes before your own!
Animation Supervisor Notes – Categorized
- the jump is floaty, add another step or scramble of the feet up the rock
- back legs look a little cowboy in places
- gallop in seems slow, speed up a little
- if you can, try to get a little skid/skitter before he leaps up the rock
- add hesitation before dog jumps from the rock
- closer match the jump against the reference
- same for the gallop, match poses of the reference for the hind legs and hips
- in general clean up poses and make sure the mechanics are correct
1. Get messy before you refine. Do the notes that are destructive to your keys first. There’s no point working on poses when you have to change timings in your animation. Freely scale and offset of keys – don’t worry if you create subframe keys.
-gallop in seems slow, speed up a little
-add hesitation before dog jumps from the rock
2. Reference Specific. Analyse and find reference that match your notes and carefully apply what you’ve learnt.
-closer match the jump against the reference
-if you can, try to get a little skid/skitter before he leaps up the rock
-the jump is floaty, add another step or scramble of the feet up the rock
-same for the gallop, match poses of the reference for the hind legs and hips
3. Posing and Mechanics. By now your general motion should be pretty wound up and it’s time to step through every frame of your animation refine every pose.
-back legs look a little cowboy in places
-in general clean up poses and make sure the mechanics are correct
5.2 – Quad specific things to look out for
- swinging/tilting of the chest and hips
- animate scapula’s
- check your foot falls are contacting the ground before chest/hips Y curve decelerates
- add toe splay on contacts
- clean up posing and compression’s of wrist and ankles
- trace your arcs for every control (chest, hips, nose, legs)
- animate the tail and ears, pretty much the last thing you do
- always check your animation from above as well as profile
5.3 – Notes on Setup an Method
Bringing back the cog/full body control
Step ∞ – What Now!?
Repeat Step 5. Get notes from the client and more from your supervisor.. then do those notes and polish the thing until it’s approved!
Advice if you are studying – Limit your time polishing to the time you spent doing Steps 1-4. Don’t over polish, start a new animation instead!